ansheng’s blog!
Python全栈之路系列之基础篇
Python的诞生
Python是著名的”龟叔“Guido van Rossum(吉多·范罗苏姆)在1989年圣诞节期间,为了打发无聊的圣诞节而编写的一个编程语言。

Python语法很多来自C,但又受到ABC语言的强烈影响,来自ABC语言的一些规定直到今天还富有争议,比如强制缩进,但这些语法规定让Python变得更易读。
Guido van Rossum著名的一句话就是Life is short, you need Python,译为:人生苦短,我用Python,一直到现在,无论在任何介绍Python这门强大的语言时,都会有提到。
截至到目前2017年1月6日,Python在Tiobe的排名还是很靠前的,而且近几年来说Python上升的趋势还是特别稳定的,这两年一直保持在第四位,甚至已经超越PHP和C#。
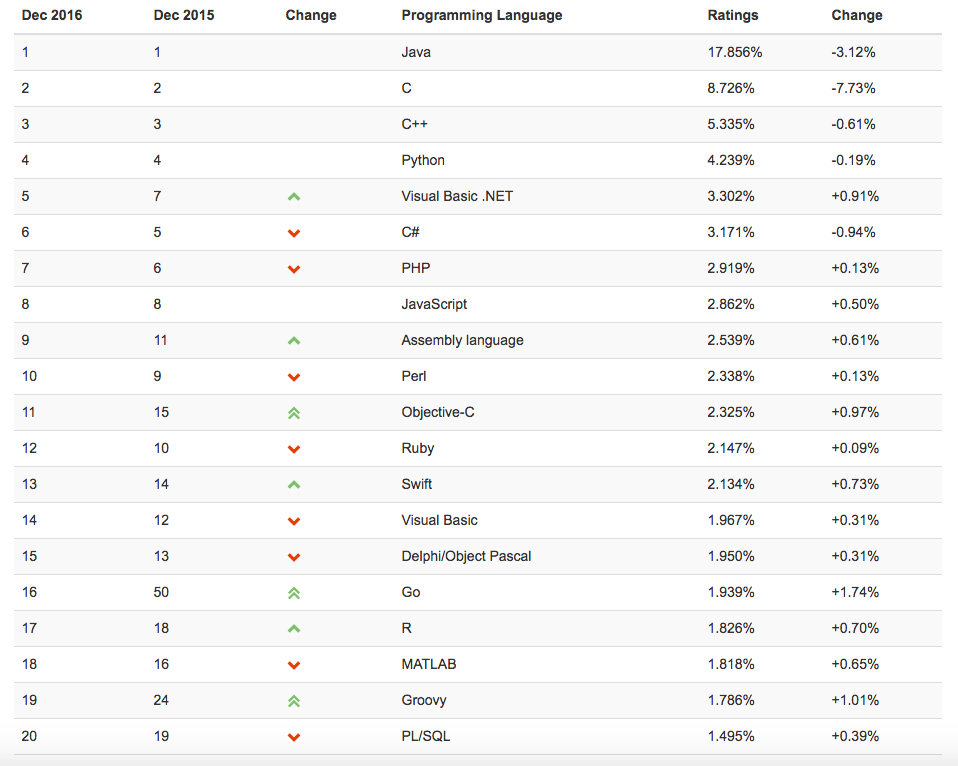
查询网站:http://www.tiobe.com/tiobe_index?page=index
我们还可以再解释下下通过import this查看Python语言的设计哲学:
>>> import this
The Zen of Python, by Tim Peters

Beautiful is better than ugly.
Explicit is better than implicit.
Simple is better than complex.
Complex is better than complicated.
Flat is better than nested.
Sparse is better than dense.
Readability counts.
Special cases aren't special enough to break the rules.
Although practicality beats purity.
Errors should never pass silently.
Unless explicitly silenced.
In the face of ambiguity, refuse the temptation to guess.
There should be one-- and preferably only one --obvious way to do it.
Although that way may not be obvious at first unless you're Dutch.
Now is better than never.
Although never is often better than *right* now.
If the implementation is hard to explain, it's a bad idea.
If the implementation is easy to explain, it may be a good idea.
Namespaces are one honking great idea -- let's do more of those!
Python唯一的缺点就是他的性能,它达不到像C和C++这种编译性语言运行的那么快,但是我们通常都不需要考虑这个问题,因为有PYPY,它的运行速度比默认的Cpython要快很多。
在Win10下安装Python3
下载Python解释器
64位下载地址:https://www.python.org/ftp/python/3.5.2/python-3.5.2-amd64.exe 32位下载地址:https://www.python.org/ftp/python/3.5.2/python-3.5.2.exe
安装Python解释器
下载下来之后双击安装,在安装的时候稍微需要注意一下就是需要修改默认的安装路径和和自动注册到系统环境变量勾选上。
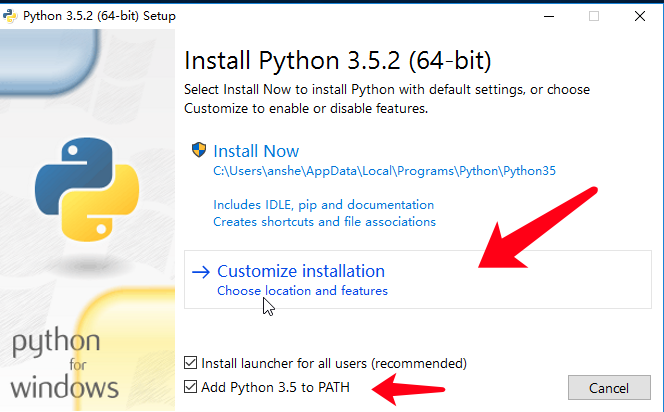
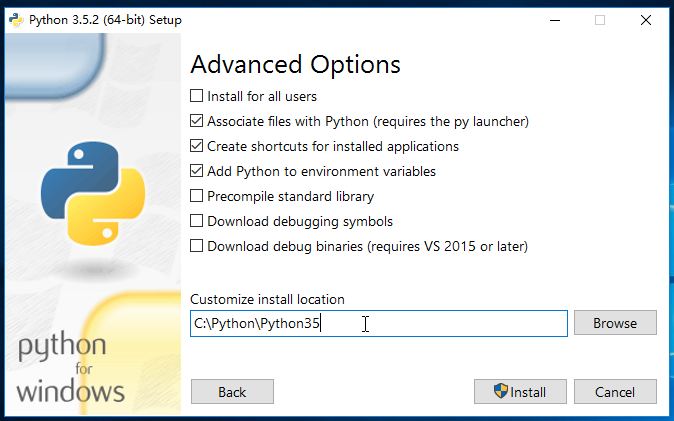
然后就可以点击Install按钮进行安装了。
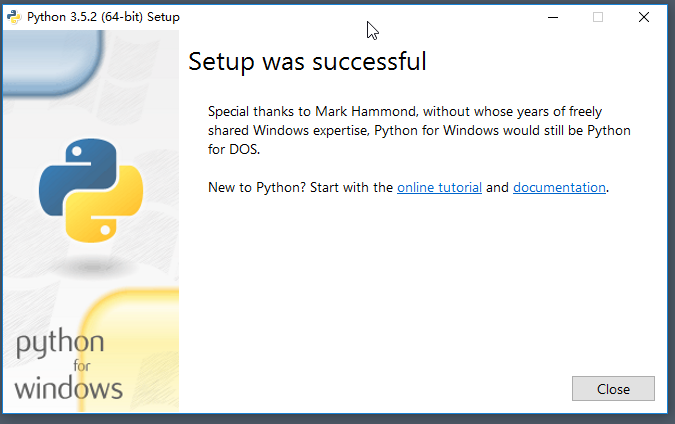
因为我们已经勾选自动注册环境变量,所以在这里就不需要修改环境变量,直接运行即可;
DOS测试
右键开始菜单选择命令提示符,打开CMD窗口,
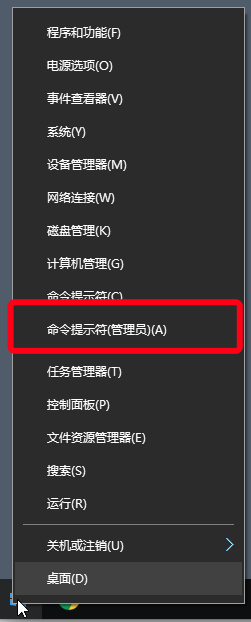
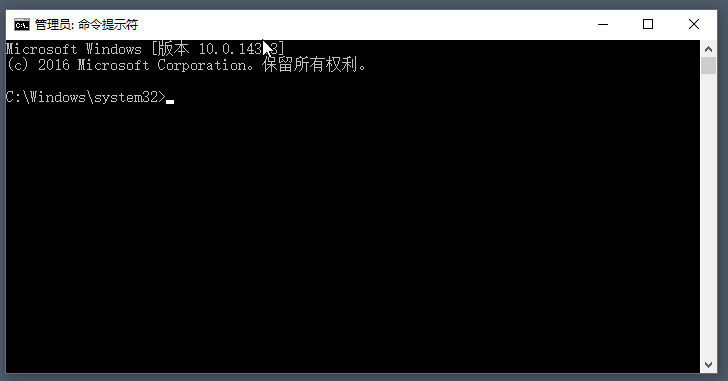
在cmd窗口中输入python -V指令查看安装的Python版本:
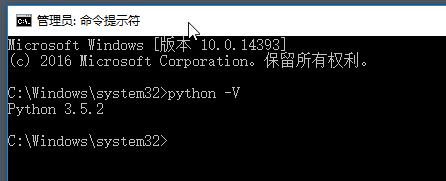
如果你得到的结果和我一样,那么你就安装好了windows下的python环境。
因为在Mac os和其他unix和Linux版本下都已经自带了Python,这里我就不做太多介绍了。
Python实现方式
Python身为一门编程语言,但是他是有多种实现方式的,这里的实现指的是符合Python语言规范的Python解释程序以及标准库等。
Python的实现方式主要分为三大类
- Cpython
- Jpython
- IronPython
CPython
Cpython是默认的Python解释器,这个名字根据它是可移植的ANSI C语言代码编写而成的这事实而来的。
当执行Python执行代码的时候,会启用一个Python解释器,将源码(.py)文件读取到内存当中,然后编译成字节码(.pyc)文件,最后交给Python的虚拟机(PVM)逐行解释并执行其内容,然后释放内存,退出程序。

当第二次在执行当前程序的时候,会先在当前目录下寻找有没有同名的pyc文件,如果找到了,则直接进行运行,否则重复上面的工作。
pyc文件的目的其实就是为了实现代码的重用,为什么这么说呢?因为Python认为只要是import导入过来的文件,就是可以被重用的,那么他就会将这个文件编译成pyc文件。
python会在每次载入模块之前都会先检查一下py文件和pyc文件的最后修改日期,如果不一致则重新生成一份pyc文件,否则就直接读取运行。
Jython
Jython是个Python的一种实现方式,Jython编译Python代码为Java字节码,然后由JVM(Java虚拟机)执行,这意味着此时Python程序与Java程序没有区别,只是源代码不一样。此外,它能够导入和使用任何Java类像Python模块。
IronPython
IronPython是Python的C#实现,并且它将Python代码编译成C#中间代码(与Jython类似),然后运行,它与.NET语言的互操作性也非常好。
Python简单入门
Hello Word
一般情况下程序猿的第一个小程序都是简单的输出Hello Word!,当然Python也不例外,下面就让我们来用Python输出一句Hello Word!吧!
创建一个以py结尾的文件
[root@ansheng python_code]# touch hello.py
其内容为
#!/usr/vin/env python

print "Hello Word!"
用Python执行
[root@ansheng python_code]# python hello.py
Hello Word!
输出的内容为Hello Word!,OK,你的第一次一句木有了^_^
指定Python解释器
在Python文件的开头加入以下代码就制定了解释器。
第一种方式
#!/usr/bin/python

import sys
print(sys.version)  # 输出Python版本
告诉shell这个脚本用/usr/bin/python执行
第二种方式
#!/usr/bin/env python

import sys
print(sys.version)  # 输出Python版本
在操作系统环境不同的情况下指定执行这个脚本用python来解释。
执行Python文件
执行Python文件的方式有两种
例如hello.py的文件内容为
#!/usr/bin/env python
print "Life is short, you need Pytho"
第一种执行方式
[root@ansheng python_code]# python my.py
Life is short, you need Pytho
如果使用python my.py这种方式执行,那么#!/usr/bin/python会被忽略,等同于注释。
第二种执行方式
[root@ansheng python_code]# chmod +x my.py
[root@ansheng python_code]# ./my.py
Life is short, you need Pytho
如果使用./my.py 来执行,那么#!/usr/bin/python则是指定解释器的路径,在执行之前my.py这个文件必须有执行权限。
python my.py 实则就是在my.py文件顶行加入了#!/usr/bin/python
指定字符编码
python制定字符编码的方式有多种,而编码格式是要写在解释器的下面的,常用的如下面三种:
第一种
#!/usr/bin/env python
# _*_ coding:utf-8 _*_
第二种
#!/usr/bin/env python
# -*- coding:utf-8 -*-
第三种
#!/usr/bin/env python
# coding:utf-8
代码注释
单行注释
单行注释只需要在代码前面加上#号
# 注释内容
多行注释
多行注释用三个单引号或者三个双引号躲起来
"""
注释内容
"""
实例
py脚本原文件内容
#!/usr/bin/env python
# _*_ coding:utf-8 _*_

print "My name is Ansheng"
print "I'm a Python developer"
print "My blog URL: https://blog.ansheng.me"
print "Life is short, you need Pytho"
源文件输出的内容
[root@ansheng python_code]# python note.py
My name is Ansheng
I'm a Python developer
My blog URL: https://blog.ansheng.me
Life is short, you need Pytho
单行注释演示
代码改为
#!/usr/bin/env python
# _*_ coding:utf-8 _*_

print "My name is Ansheng"
print "I'm a Python developer"
print "My blog URL: https://blog.ansheng.me"
#print "Life is short, you need Pytho"
执行结果
[root@ansheng python_code]# python note.py
My name is Ansheng
I'm a Python developer
My blog URL: https://blog.ansheng.me
结果Life is short, you need Pythoprint出来
多行注释演示
代码改为
#!/usr/bin/env python
# _*_ coding:utf-8 _*_

print "My name is Ansheng"
"""
print "I'm a Python developer"
print "My blog URL: https://blog.ansheng.me"
print "Life is short, you need Pytho"
"""
执行结果
[root@ansheng python_code]# python note.py
My name is Ansheng
结果I'm a Python developer、My blog URL: https://blog.ansheng.me、Life is short, you need Pytho都没有print出来
print输出多行
既然用单个单引号或者多引号可以注释多行,那么能不能print多行呢?
代码
#!/usr/bin/env python
# _*_ coding:utf-8 _*_

print """
My name is Ansheng
I'm a Python developer
My blog URL: https://blog.ansheng.me
Life is short, you need Python.
"""
执行结果
[root@ansheng python_code]# python note.py

My name is Ansheng
I'm a Python developer
My blog URL: https://blog.ansheng.me
Life is short, you need Python.
显然这是可以得 ^_^
变量
变量的命名规则:
- 变量名只能包含数字、字母、下划线
- 不能以数字开头
- 变量名不能使python内部的关键字
Python内部已占用的关键字
['and', 'as', 'assert', 'break', 'class', 'continue', 'def', 'del', 'elif', 'else', 'except', 'exec', 'finally', 'for', 'from', 'global', 'if', 'import', 'in', 'is', 'lambda', 'not', 'or', 'pass', 'print', 'raise', 'return', 'try', 'while', 'with', 'yield']
在Python中变量是如何工作的?
- 变量在他第一次赋值时创建;
- 变量在表达式中使用时将被替换它们所定义的值;
- 变量在表达式中使用时必须已经被赋值,否则会报
name 'xxx' is not defined; - 变量像对象一样不需要在一开始进行声明;
动态类型模型
首先让我们抛出一个简单的问题为什么要学习动态类型模型。
如下如语句中我声明了一个变量age,值为21
>>> age = 21
>>> age
21
>>> type(21)
# 数字类型
<class 'int'>
上述代码中我给age赋值为21,但是并没有指定它的值为数字类型,那么Python怎么知道他是一个数字类型呢?其实,你会发现,Python在运行的过程中已经决定了这个值是什么类型,而不用通过指定类型的方式。
垃圾收集
在Python基础中还有一个比较重要的概念就是垃圾回收机制,下面我们通过代码来验证:
>>> a = 1
>>> b = a
>>> id(a),id(b)
(4297546560, 4297546560)
上面的实例代码中发生了什么?
首先我们声明了一个变量a和变量b,a等于1,b等于a,其实就是把b的值通过指针指向a的值,通过id()内置函数我们可以清楚地看到这两个变量指向的是同一块内存区域。
再继续下面实例代码
>>> name = 'ansheng'
>>> name = 'as'
>>> name
'as'
通过上面这个实例,可以清楚的理解到垃圾回收机制是如何工作的:
- 创建一个变量
name,值通过指针指向'ansheng'的内存地址; - 如果
'ansheng'这个值之前没有在内存中创建,那么现在创建他,并让这个内存地址的引用数+1,此时等于1; - 然后对变量
name重新赋值,让其指针指向'as'的内存地址; - 那么此时
'ansheng'值的引用数现在就变成0,当Python一旦检测到某个内存地址的引用数等于0时,就会把这个内存地址给删掉,从而释放内存; - 最后name值的指针指向了
'as'的内存地址,所以name就等于'as'
定义变量
>>> name = "ansheng"
>>> print name
ansheng
基本的数据类型
字符串(str)
定义字符串类型是需要用单引号或者双引号包起来的
>>> name = "ansheng"
>>> print(type(name))
<type 'str'>
或者
>>> name = 'ansheng'
>>> print(type(name))
<type 'str'>
数字(int)
整数类型定义的时候变量名后面可以直接跟数字,不要用双引号包起来。
>>> age = 20
>>> print(type(age))
<type 'int'>
布尔值
布尔值就只有True(真),Flash(假)
>>> if True:
...  print("0")
... else:
...  print("1")
...
0
解释:如果为真则输出0,否则输出1
流程控制
if语句
if语句是用来检查一个条件:如果条件为真(true),我们运行一个语句块(你为if块),否则(else),我们执行另一个语句块(称为else块),else子语句是可选的。
单条件
例题:如果num变量大于1,那么就输出num大,否则就输出num小,num值为5。
代码
#!/usr/bin/env python
# -*- coding:utf-8 -*-
num = 5

if num > 1:
 print("num大")
else:
 print("num小")
结果
[root@ansheng python_code]# python num.py
num大
多条件
例题:如果num变量大于5,那么就输出num大于5,如果num变量小于5,那么就输出num小于5,否则就输出num等于5,num值为5。
#!/usr/bin/env python
# -*- coding:utf-8 -*-
num = 5

if num > 5:
 print("num大于5")
elif num < 5:
 print("num小于5")
else:
 print("num等于5")
结果
[root@ansheng python_code]# python num.py
num等于5
while循环
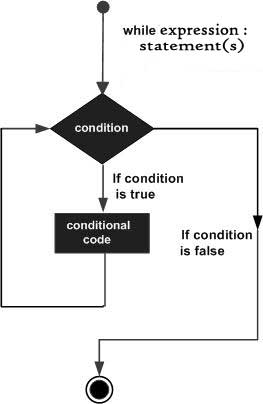
while语句用于循环执行程序,即在某条件下,循环执行某段程序,以处理需要重复处理的相同任务。 执行流程图如下
实例:
定义一个变量count,默认值为1,然后进去while循环,让其输出1-10,如果大于10则退出。
#!/usr/bin/env python
# _*_ coding:utf-8 _*_

count = 1

print "Start...."

while count < 11:
 print "The count is:",count
 count += 1

print "End...."
执行结果如下
[root@ansheng python_code]# python while.py
Start....
The count is: 1
The count is: 2
The count is: 3
The count is: 4
The count is: 5
The count is: 6
The count is: 7
The count is: 8
The count is: 9
The count is: 10
End....
break
跳出当前循环体,下面代码不再执行,继续执行循环后面的代码
实例
#!/usr/bin/env python
# _*_ coding:utf-8 _*_

count = 1

print "Start...."

while count < 11:
 if count == 5:   #如果count等于5,那么我就退出当前循环体
  break
 print "The count is:",count
 count += 1

print "End...."
输出结果
[root@ansheng python_code]# python while.py
Start....
The count is: 1
The count is: 2
The count is: 3
The count is: 4
End....
continue
跳出本次循环,继续下一次循环
代码
#!/usr/bin/env python
# _*_ coding:utf-8 _*_

count = 1

print "Start...."

while count < 11:
 if count == 5:		#如果count等于5,那么我就让其+1,然后不执行下面的代码,继续下一次循环
  count += 1
  continue
 print "The count is:",count
 count += 1

print "End...."
输出结果
[root@ansheng python_code]# python while.py
Start....
The count is: 1
The count is: 2
The count is: 3
The count is: 4
The count is: 6
The count is: 7
The count is: 8
The count is: 9
The count is: 10
End....
条件判断
条件判断适用于if、while等。
等于
if 1 == 1:
不等于
if 1 != 2:
小于
if 1 < 1
大于
if 1 > 1:
并且
if 1 == 1 and 1 > 0:
或者
if 2 > 1 or 2 == 2:
永远为真
if True:
永远为假
if False:
交互式输入
Python的交互式输入使用的是input()函数实现的,注意在Python2.7.x版本的时候可以使用raw_input()和input()函数,但是在Python3.5.x版本的时候就没有raw_input()函数了,只能够使用input()
例题:用户在执行脚本的时候,让他输入自己的名字,然后打印出来。
代码
#!/usr/bin/env python
# _*_ coding:utf-8 _*_

username = input("请输入你的名字:")
print("你的名字是:", username)
执行结果
[root@ansheng python_code]# python input.py
请输入你的名字:安生   # 输入你的名字
你的名字是: 安生      # 打印出你的名字
练习题
使用while循环输入1 2 3 4 5 6 8 9 10
思路: 首先定义一个变量num,值为1,然后用while循环输出1-10的内容,在while循环内加入if语句,判断当前的值如果是7,那么就让7+1,加完之后跳出本次循环,不执行下面的print,7跳出本次循环之后,第二轮的时候num就是8了,而不是7.
代码
#!/use/bin/env python
# _*_ coding:utf-8 _*_

num = 1
while num < 11:
    if num == 7:
        num += 1
        continue
    print(num)
    num += 1
输出内容为:
1
2
3
4
5
6
8
9
10
求1-100的所有数的和
思路:定义两个变量,分别是count和num,利用while语句循环输出1-100,然后每次就让count+num,这样循环一百次之后相加的结果就是1到100的和了。
代码
#!/use/bin/env python
# _*_ coding:utf-8 _*_

count = 1
num = 0
while count < 101:
    num = num + count
    count += 1

print(num)
输出结果
5050
输出 1-100 内的所有奇数
思路: 利用%整数相除的余,如果余数是1那么当前的count就是奇数,如果余0,那么当前的count就是偶数。
代码
#!/use/bin/env python
# _*_ coding:utf-8 _*_

count = 1

while count < 101:
    num = count % 2
    if num == 1:
        print(count)
    count += 1
结果自己执行看
输出 1-100 内的所有偶数
代码
#!/use/bin/env python
# _*_ coding:utf-8 _*_

count = 1

while count < 101:
    num = count % 2
    if num == 0:
        print(count)
    count += 1
结果自己执行看
求1-2+3-4+5 … 99的所有数的和
#!/use/bin/env python
# _*_ coding:utf-8 _*_

count = 1

while count < 100:
    if count == 1:
        num = count
    elif count % 2 == 1:
        num = num + count
    elif count % 2 == 0:
        num = num - count
    count += 1

print(num)
结果
50
用户登陆
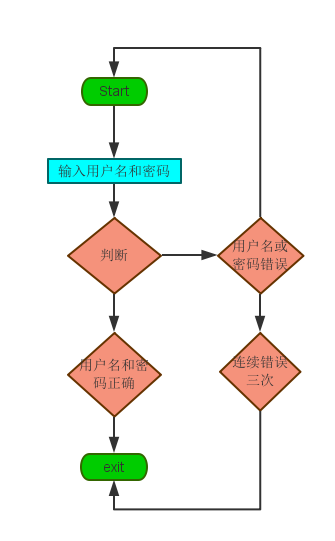
需求:写一个脚本,用户执行脚本的时候输入用户名和密码,如果用户名或者密码连续三次输入错误则退出,如果输入正确则显示登陆成功,然后退出。
用户名和密码自己定义
- 图解用户登录流程
- 代码
#!/use/bin/env python
# _*_ coding:utf-8 _*_
import getpass

# username:ansheng
# userpass:666666

count = 3

while count > 0:
    username = input("User Name:")
    userpass = getpass.getpass("pass:")
    if username == "ansheng" and userpass == "666666":
        print "User:", username, ",login successful!"
        break
    else:
        count -= 1
        if count != 0:
            print "Login failed", count
        else:
            print("The maximum number of login!")
登陆成功演示
User Name:ansheng  #输入用户名
pass:              #输入密码,密码是看不到的,因为调用了getpass模块
User: ansheng ,login successful!  #显示用户ansheng,登陆成功
登陆失败演示
User Name:as
pass:
Login failed 2
User Name:an
pass:
Login failed 1
User Name:ansea
pass:
The maximum number of login!
账号或密码连续三次输入错误则退出程序,并且每次提醒用户升序多少次登陆的机会。